Advantages of Smart Inspection Sensors
3D scanning is the process of capturing the geometry of a physical object and creating a digital model of it. This can be done using various methods such as laser scanning, photogrammetry, structured light scanning, or computed tomography (CT) scanning. 3D scanning can be used for a variety of purposes, including creating digital models for 3D printing, reverse engineering, and inspection.
3D inspection involves using 3D scanning technology to inspect the quality of a manufactured part or component. This can be done by comparing the 3D scan of the manufactured part to the original 3D model, looking for deviations or defects. 3D inspection can be automated, which increases speed and accuracy, and reduces the need for human intervention.
Some of the advantages of using 3D scanning and inspection include:
- Accuracy: 3D scanning and inspection can provide highly accurate measurements of the physical object being scanned, with precision down to a few microns.
- Speed: 3D scanning and inspection can be performed quickly, especially when automated, allowing for faster production and quality control processes.
- Non-destructive: 3D scanning and inspection are non-destructive methods, meaning that the physical object being scanned remains intact and can be used after the process is complete.
- Flexibility: 3D scanning and inspection can be used on a wide variety of objects, from small parts to large structures.
Overall, 3D scanning and inspection can be valuable tools for a variety of industries, including manufacturing, aerospace, automotive, healthcare, and entertainment.
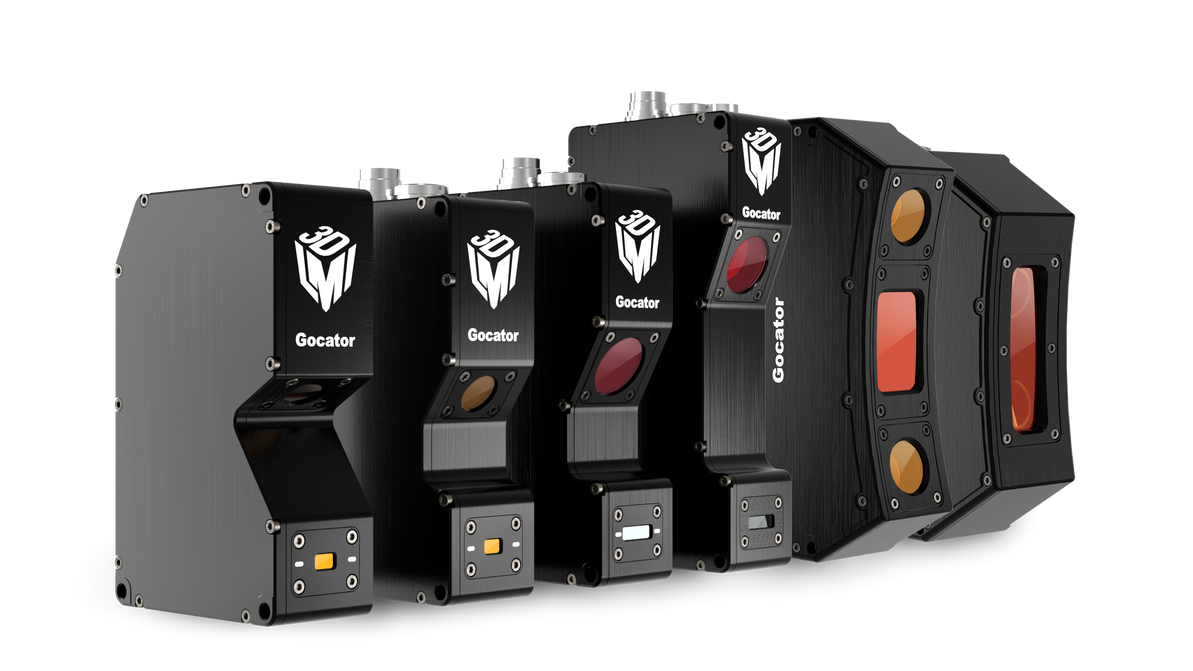
LMI Technologies Gocator all-in-one 3D smart sensors are trusted worldwide for automated inline inspection.
SCAN, MEASURE & CONTROL
Gocator combines 3D scanning, measurement and control in a single device, with no external PCs or controllers required. This efficient design paired with high performance functionality makes Gocator easy to integrate into existing inspection systems—minimizing system cost and maximizing product quality and throughput. All Gocators are factory pre-calibrated so users can immediately set up the sensor via a web browser and configure functions such as exposure, triggering logic, dimensional measurement tools and communication method. Once setup is complete, simply disconnect the computer, and the Gocator runs standalone delivering high-speed, micron-level measurements in real-time for a wide variety of critical inspection applications.
Gocator is available in a wide selection of models suited to your exact application.
COMPLETE 3D INSPECTION. BUILT–IN.
Gocator leverages both laser triangulation and fringe pattern projection. These technologies provide optimal 3D scanning for both high speed and stationary 3D part inspection.
WEB ENABLED
Built-in web server, no separate software required. Use a standard web browser for setup and control. Easy-to-use, intuitive, multi-language interface. View real-time data on any computer, any OS.
APPLICATION READY
Built-in measurement tools, no coding necessary. Easy setup allows real 3D measuring in minutes, not days. Tag and track parts for sorting and rejecting defects right from the sensor. Use as a single sensor, dual sensor system, or scale up to a network of sensors. Measure profiles or volumes and detect surface patterns all with the same sensor.
FLEXIBLE
Available in single point profile, line profile and snapshot technologies. Choice of 2M, 3R, and 3B laser classes. Open source SDK for custom application development. Gocator Development Kit (GDK) for custom firmware development. Emulator for simulation of pre-recorded data sets. Leverage the power of a PC with the Gocator Accelerator.
HIGH PERFORMANCE
Scan rates up to 32,000 Hz. Micron resolution with a large field of view. Gigabit Ethernet real-time data delivery. Refer to datasheets for specifications for each model.
FACTORY PRE-CALIBRATED
Delivers real world coordinates, right out of the box. Highly accurate assembly process for consistent, reliable, and precise measurement.
RICH I/O
Interface to your existing control systems, including PLCs and robots. Interface with your existing control systems, including PLCs. Choose how you want to trigger and scan. Select Ethernet, digital, analog, and/ or serial data output.
COMPACT FOOTPRINT
Easily fits into small spaces. Can be used on robotic arms. Fits your application without costly modifications.
THERE’S A COMPLETE INSPECTION ECOSYSTEM INSIDE EVERY GOCATOR.
Gocator is the ultimate inspection platform—masterfully combining 3D data acquisition, measurement and control with revolutionary extensibility and a fully integrated user experience.
SIMPLE SETUP
Setting up your Gocator is fast, easy and trouble free.
- Use your favorite web browser to access and control the Gocator
- Multi-language ready for non-English speakers to set up and fully utilize
- Drag & drop functionality allows you to easily set up Gocator to work within your existing control system
- Intuitive control panels make setup fast and easy
Allows you to get the job done with the fewest components in the least amount of time.
- Onboard web server allows for fast setup on any computer
- Connect via industry standard Ethernet
- Simple cabling for inputs, outputs and power
- True standalone operation allows you to set up and walk away
- Modbus TCP, EtherNet/IP™, and simple ASCII string support for “plugging into” PLCs or robot controllers
- No hidden costs or additional hardware required
Have questions? Explore LMI Technologies Gocator Sensors or contact us for assistance in selecting the right sensor for your application.
Sources: https://chat.openai.com/chat; https://lmi3d.com/wp-content/uploads/2020/04/BROCHURE_Gocator_US_V3-3_WEB.pdf
Recent Posts
-
Using Scan Tunnels to Track, Sort and Route Warehouse Packages
If you’re using conveyor lines to move products, packages and shipments through your warehouse, the …Apr 17th 2024 -
Embracing Collaboration: How Universal Robots Transformed DeAngelo Marine Exhaust
When the welding robots made their debut at DeAngelo Marine Exhaust, there was a mix of excitem …Apr 11th 2024 -
How to Speed Up Your Warehouse Packing by 33% with Machine Vision
Packing benches are some of the busiest areas of most warehouses, with thousands of items to pack i …Apr 4th 2024


